You’ve built your static site – now it’s time to take it live.
If terms like DNS, domain names, and URL configurations make your head spin, you’re not alone. Getting your static site live can feel technical, but it doesn’t have to be overwhelming.
In this guide, we’ll break it down step by step. You’ll learn exactly how to connect your site to a domain, customize your settings, and get everything up and running for the world to see.
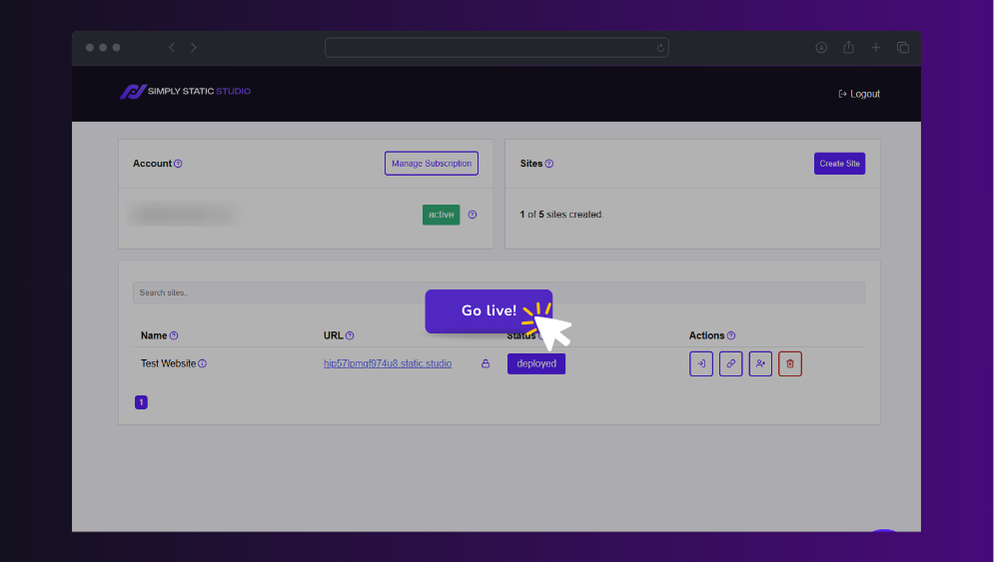
Here’s a breakdown of what we’ll be covering:
- Setting up your static site with Simply Static Studio.
- Connecting your domain to make your static site live.
- Updating essential information in Google Analytics and reCAPTCHA.
- Updating internal links and URLs.
- Monitoring and maintaining your live site.
First things first, let’s create your static site with Simply Static Studio before making it live.

Step 1: Set up your static site with Simply Static Studio
To kick things off, we’ll start by setting up your static site with Simply Static Studio. But, what exactly is Simply Static Studio?
This is a managed platform designed to make creating and managing static WordPress sites easy. Simply Static Studio is based on the Simply Static pluginA piece of software that adds specific features to WordPress., which is a powerful static site generator (SSG) plugin for WordPress websites.
It combines this plugin, CDNStands for Content Delivery Network. It’s a system of distributed servers that deliver web content quickly to users base… hosting, security, and performance optimization for static WordPress sites under one roof. Its key purpose is to help you create and manage these sites without the usual hassles of doing so, such as:
- Setting up and managing web servers.
- Getting web hosting.
- Managing your site’s security.
- Improving your site’s performance.
- And so on.
Simply Static Studio will do the heavy lifting and handle all this for you.
Why create your static site with Simply Static Studio
There are so many reasons why Simply Static Studio is the ideal platform for creating and managing static WordPress sites.
It makes it easy for you to create static sites in the following ways:
- No complex setup is needed. Once you log into Simply Static Studio, you can create a static WordPress site by clicking a button and naming your site.
- It installs essential tools for you. Simply Static Studio will fire up your new static website with the following pre-installed: Ollie (a WordPress block theme), WP Forms (a WordPress form builder), and both Free and Pro versions of Simply Static (the plugin that will turn your dynamic website into a static one).
- An easy-to-use dashboard. Everything you do on Simply Static Studio will be from an easy-to-use dashboard. You don’t need to go through the hassle of working with command line tools.

On top of this, Simply Static Studio will handle backups, updates, and security optimizations for you. This makes it a perfect tool for beginners and seasoned professionals because it allows you to do complex things easily and in less time.
You can make your static site live quickly
With Simply Static Studio, you’ll make your site live in two simple steps:
- Adding a CNAME record on your DNS settings.
- Connecting your custom domain on Simply Static Studio.
Since Simply Static Studio uses CNAME, the connection will be almost instant.
So, that’s a glimpse of what you’ll be getting when you create a static site with Simply Static Studio. Now, let’s go over a step-by-step tutorial on how to do this.
How to Set Up Your Site with Simply Static Studio
To start this process, you’ll need a Simply Static Studio account. To sign up for one, visit the Simply Static Studio website and:
- Click on Get Started > Don’t have an account? Sign-up buttons.
- Enter a valid email address and provide a password.
- Simply Static Studio will send you a confirmation link, which you’ll click on to activate your account.
The same link will automatically log you into the dashboard, from where you can proceed to the next step.
Create a new site
There are two ways to get your static WordPress site on the Simply Static Studio platform. They include:
- Creating a new site. You can start from scratch and create an entirely new static site.
- Migrate an existing WordPress site. Suppose you’ve already created your WordPress site and hosted it elsewhere, for instance GitHub PagesA hosting service from GitHub for publishing static websites directly from a GitHub repository., AWS, NetlifyA platform for automating web projects that provides hosting and serverless backend services for web applications and st…, etc. You can migrate it to Simply Static Studio.
To create a static site from scratch:
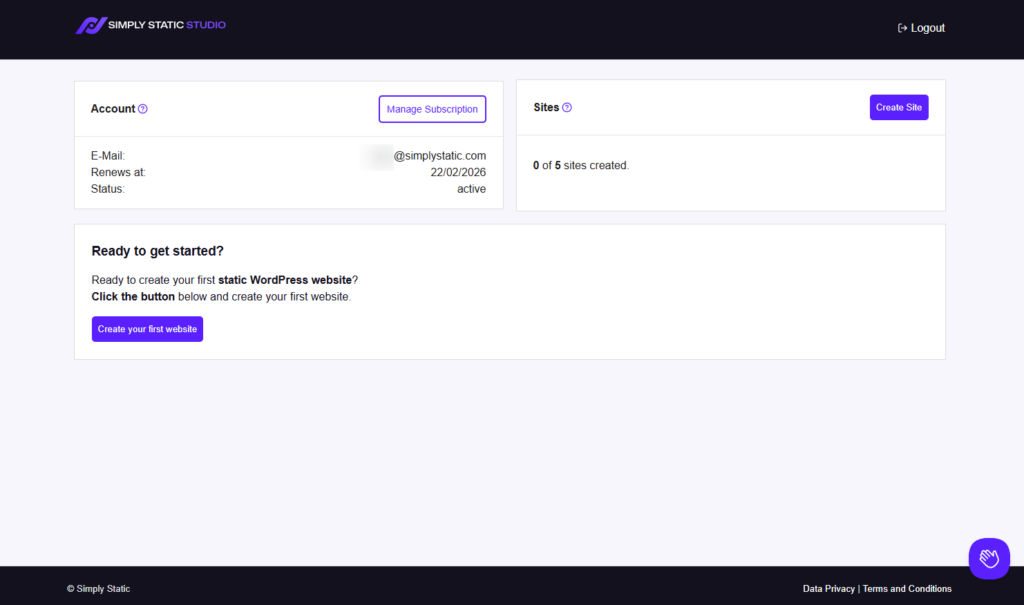
- Click the Create your first website button in the middle of the screen.
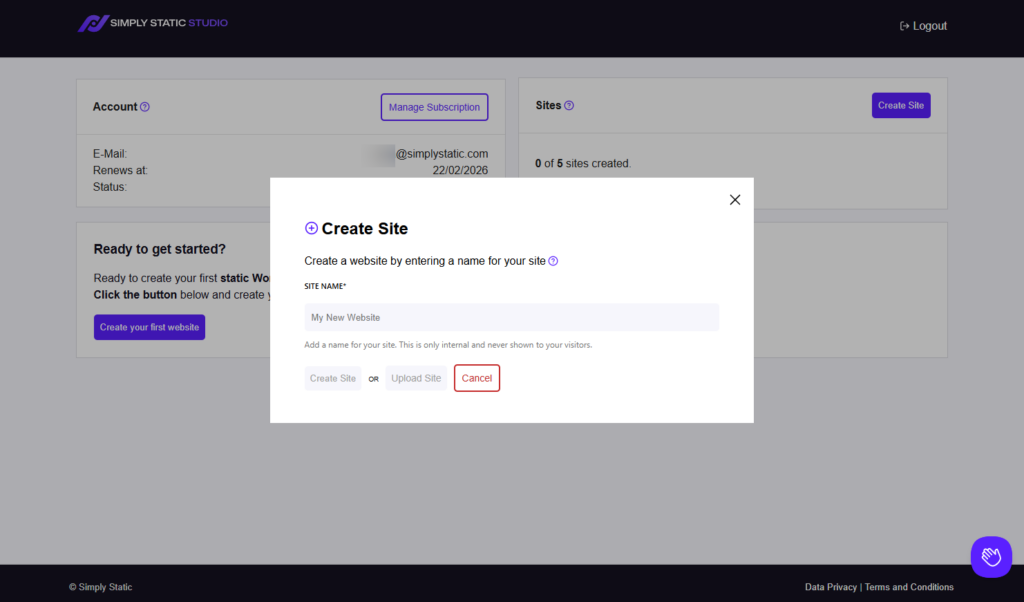
- A window will pop up, asking you to name your site. Give it any name. You can always change it later on if you want to. Also, this name is only used within the dashboard. Site visitors won’t see it.
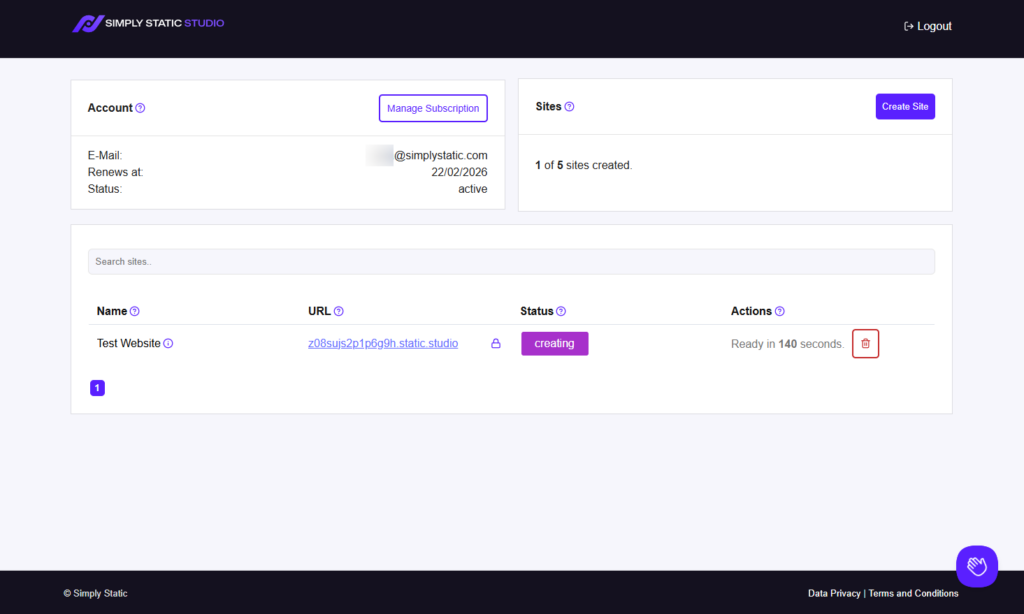
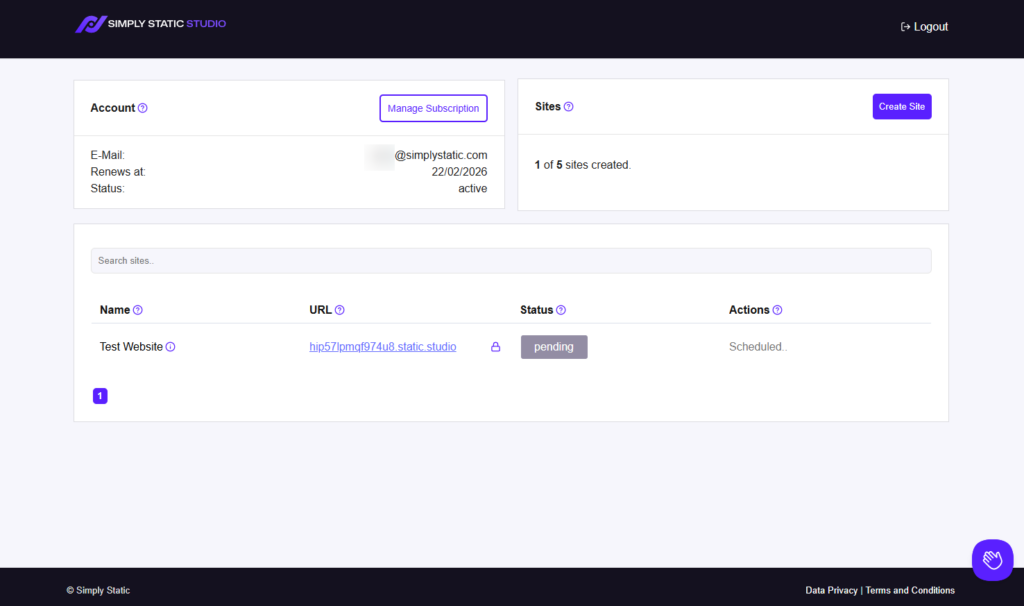
- Next, click the Create Site button. A table containing your newly created static WordPress site will appear.
- The table will have the following information in its columns:

- Name. This will be the name you give the site. To change it or inspect the credentials we automatically create for you, click the info icon.
- URL. Under this is the URL of your static WordPress site. Next to it will be a lock icon. Click on it to issue an SSLSecure Sockets Layer. A technology that encrypts the data transferred between a user and a website. certificate.
- Status. This represents the progress of your site’s deploymentThe act of pushing the static files generated by Simply Static to a live environment where users can access them.. Once you click on Create Site, it moves from pending, migrating, creating/failed, or deployed.
- Actions. Under this, you’ll see what you can do to your site once it is marked deployed.
What if you have an existing WordPress website?
(Optional) Migrate or upload an existing WordPress site
You don’t have to create a new site on Simply Static Studio if you have an existing WordPress site. You can upload it to this platform. It will then convert your dynamic WordPress site into static HTMLHyperText Markup Language. It’s the standard language for creating web pages., CSSCascading Style Sheet. It’s a language used for describing the look and formatting of a document written in HTML., and JavaScriptA programming language used in web development to create interactive elements on a webpage. files and host them.
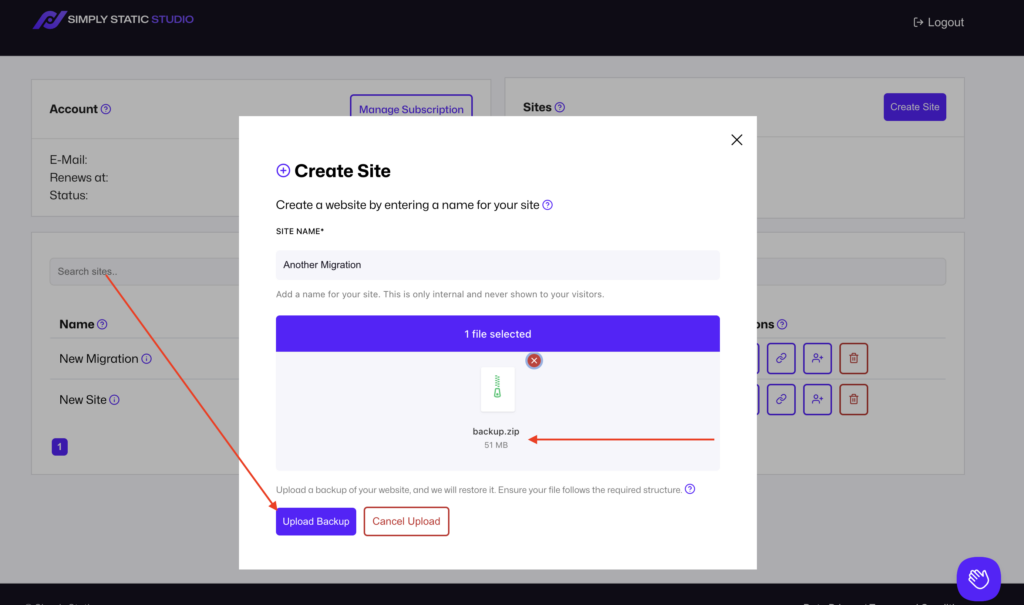
To upload an existing WordPress site:
- First, create a backup of your existing website. You can use a plugin to do this or download the backup created by your hosting provider to your computer.
- Extract this ZIP file and remove everything except the wp-content directoryA folder in a computer’s file system used for storing files and other directories. and the SQL file containing your database content. Rename the SQL file to db.sql and rezip everything.
- Go to the Simply Static Studio dashboard and click on the Create Site button at the top right.
- Add the site’s name in the window that pops up. Then click on the Upload Site button.
- You can either drag and drop the ZIP file or browse your computer and then upload it.
Once the upload is complete, Simply Static Studio will run a static exportThe process of saving the files and data from your WordPress site to create a static site. to create your site. That’s it.
To learn more about static and dynamic websites and how to create your first static website, check out our How to Create Your First Static Site guide.
Check your site
After your site is deployed, click the URL to check its front end. Confirm that the design and functionality are intact, the buttons are working correctly, and the images aren’t distorted.
If everything is okay, it’s now time to make your static site live.
Step 2: Connect your domain (make your static site live)
To make your site accessible to the public, you need to connect your domain.
Why this step is important
Connecting your domain allows users to access your website easily online. They can do it by typing a memorable and user-friendly address such as mystaticsite.com. Without it, people would have to use complex IP addresses to find your site, which is impractical.
How to connect your domain
After deploying your site, the next step is to make it live by connecting your domain. Simply Static Studio makes this simple by allowing you to add a single DNS entry and click a button.
To connect a domain to a static site on Simply Static Studio:
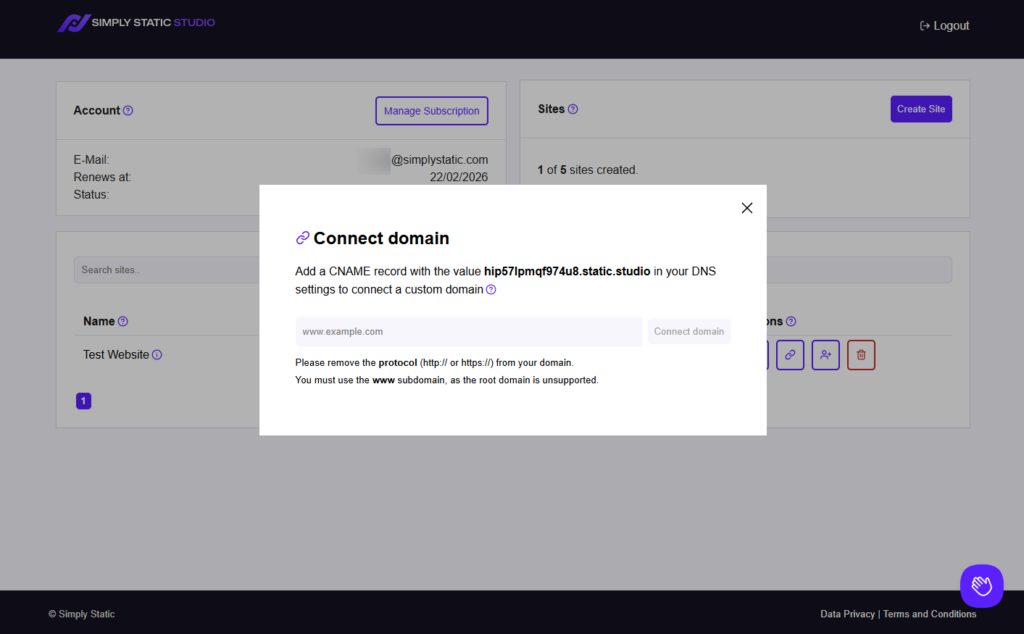
- Click the Link icon under the Actions column of the project you want to connect your domain to.
- A window will open, asking you to provide a domain name. Just above this field, you’ll see a subdomain for your project represented this way: [some characters].static.studio.
- Copy this and log in to your domain registrar (like GoDaddy, Namecheap, or CloudflareA company that provides services like security and website speed improvement. It acts as a protective layer between the …). For this guide, we’ll use Cloudflare, but these steps should be easily replicable on any other DNS tool.
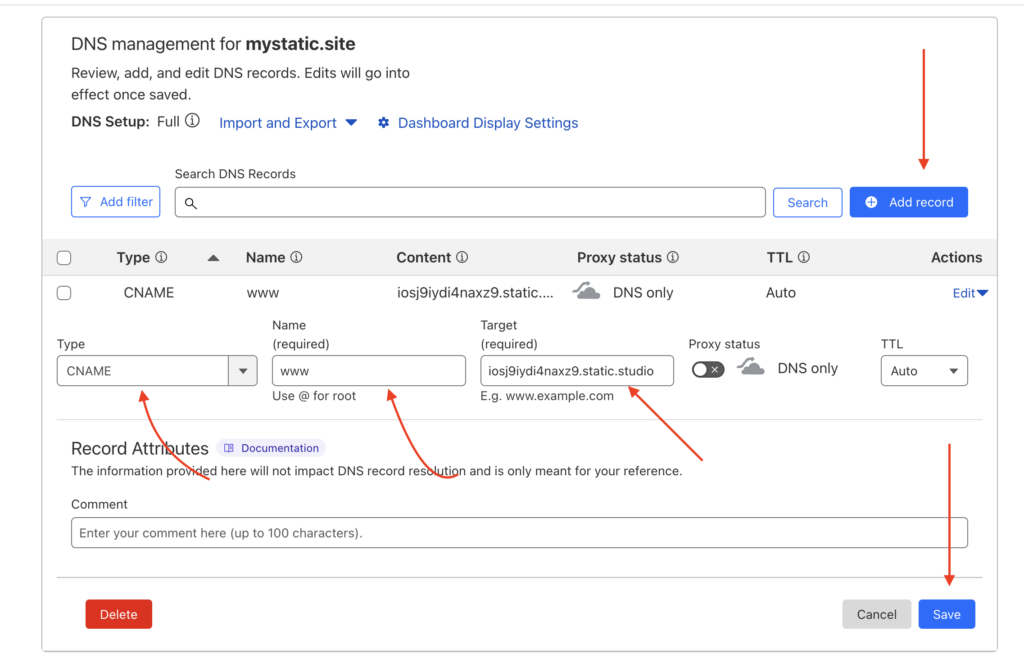
Add a CNAME record
- In Cloudflare, go to your project and click on DNS on the left side menu.
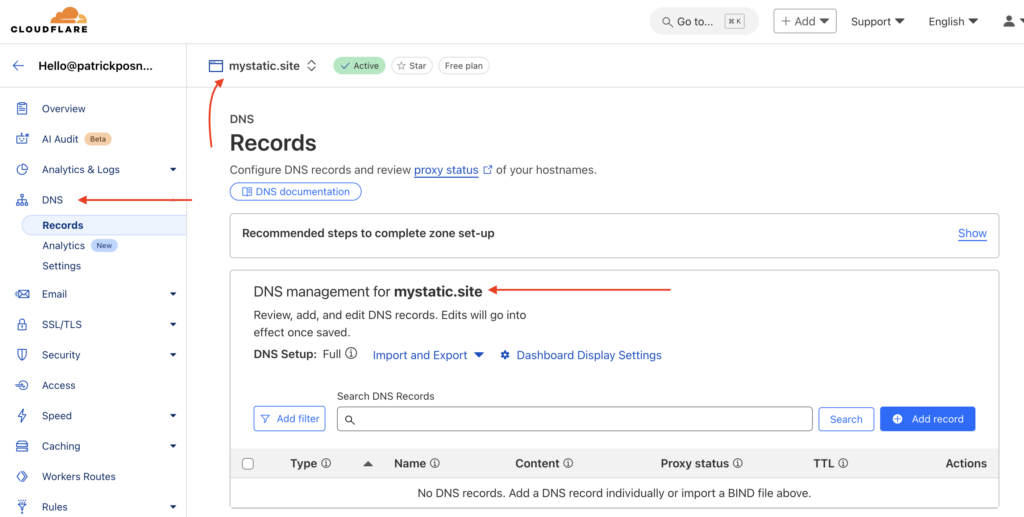
- You’ll see a few fields, and here is what you should fill in each field:
- Type: CNAME
- Name: www
- Target: your static.studio subdomain. This is the CNAME value we copied earlier.
- Proxy Status: disabled (this is only relevant for Cloudflare).
- Once everything is set up, click the Save button.
Connect domain
- Go back to your Simply Static Studio and enter your domain name in the Connect domain settings. Then click on the Connect domain button next to this field.
Note: When entering your domain name, ensure you start with www instead of http://.
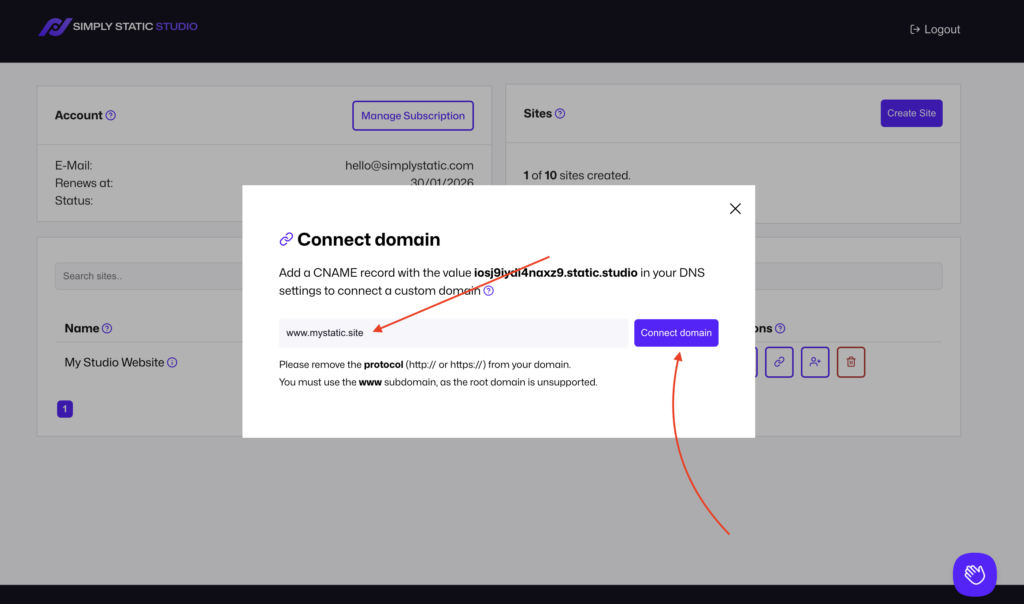
- Once this is done, you’ll see the new URL in the URL column of your project.
Once this is done, click on the URL to visit your site’s front end and verify that the URL is working correctly. Also, once your website is available under the new domain, click on the lock icon, and Simply Static Studio will issue an SSL certificate for you.
Troubleshooting Tips
Your URL will work correctly only after the DNS is fully propagated. DNS propagation is the process by which changes in DNS records are updated across the internet.
This process can take up to 48 hours, so don’t be alarmed if your URL isn’t working as expected immediately.
As you wait, you can use a tool like WhatsMyDNS.net to check the DNS status to see which DNS servers have updated their records and which haven’t. This gives you a clear picture of the propagation process.
If you’re one of the 28 million websites using Google Analytics and reCAPTCHA before migrating, there are a few settings you’ll need to update. Let’s go over what you’ll need to do in the next section.
Step 3: Update Google Analytics and reCAPTCHA
Google Analytics and reCAPTCHA are useful web services you could be using to manage your site. Google Analytics provides you with several analytics data on your website for marketing and SEO.
You can use it to:
- Track site visitors on your website.
- Measure the success of marketing campaigns.
- Obtain user information such as demographics.
- And so on.
On the other hand, Google reCAPTCHA distinguishes between human users and bots to protect your site from things like SPAM.
If you’re using both Google Analytics and reCAPTCHA before migrating to Simply Static Studio, there are a few settings you need to update. Especially if the domain changes, you’ll need to update the new domain on these platforms.

Why this is important
Updating your domain in Google Analytics allows it to track the right website. The same goes for reCAPTCHA, in that it will be able to protect the right website. An outdated domain renders Google Analytics and reCAPTCHA ineffective.
So you need to update this information to tell Google that you’ve moved on from your old domain to your new one. With that in mind, let’s go over how to update your domain name on Google Analytics and reCAPTCHA.
Google Analytics
To update your new domain on Google Analytics:
- Log in to your Google Analytics account.
- Click on the All accounts tab at the top. A window will appear showing your the accounts plus properties. Click on the property associated with your site.
- Click on Admin at the bottom of the left-side menu.
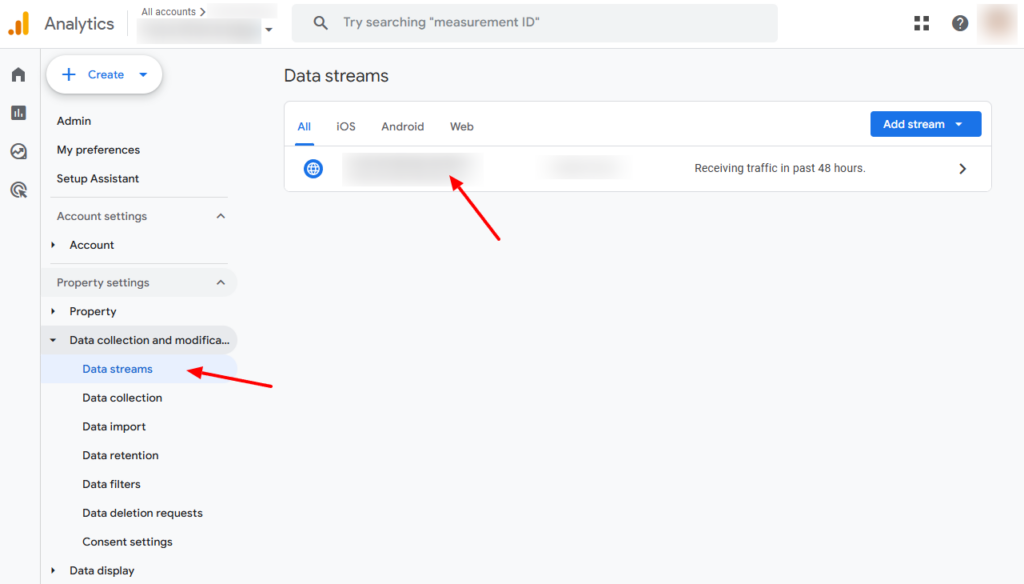
- You’ll see a bunch of settings you can edit. Click on Data streams under the Data collection and modification section.
- You’ll see your website plus its tracking data listed on a table. Click on it.
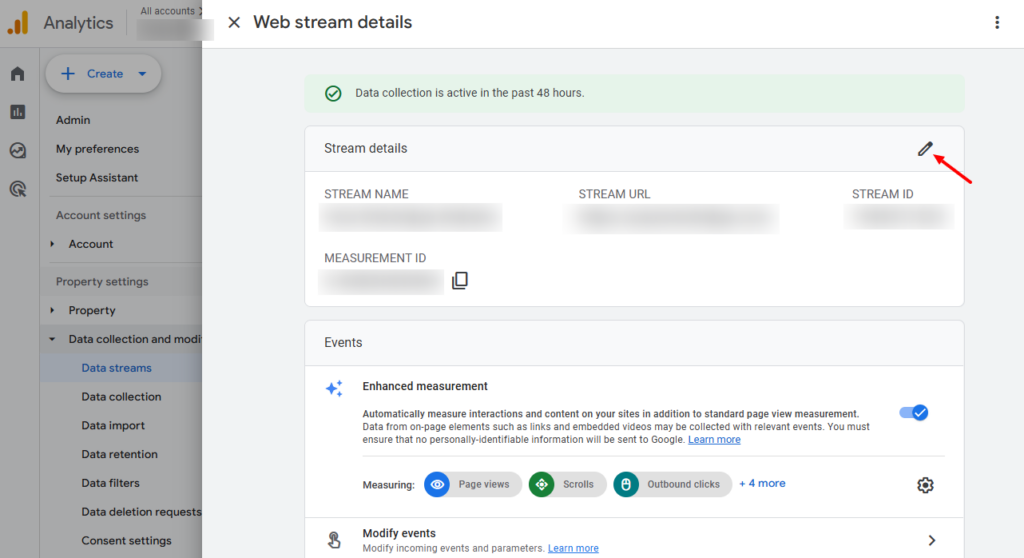
- Next, click on the Edit (pen) icon on the top right and add your new domain name.
- Click on Update stream to finish.
Some people like to create a new Google Analytics account if they move to a new domain. There’s no need to do this since you’ll lose all the historical tracking data if you do. Simply update Google Analytics on the new domain you want it to track.
Google ReCaptcha:
To do the same for Google reCAPTCHA:
- Log in to the reCAPTCHA Admin Console.
- Create your new reCAPTCHA.
- Scroll down and click on the Submit button to update your settings.
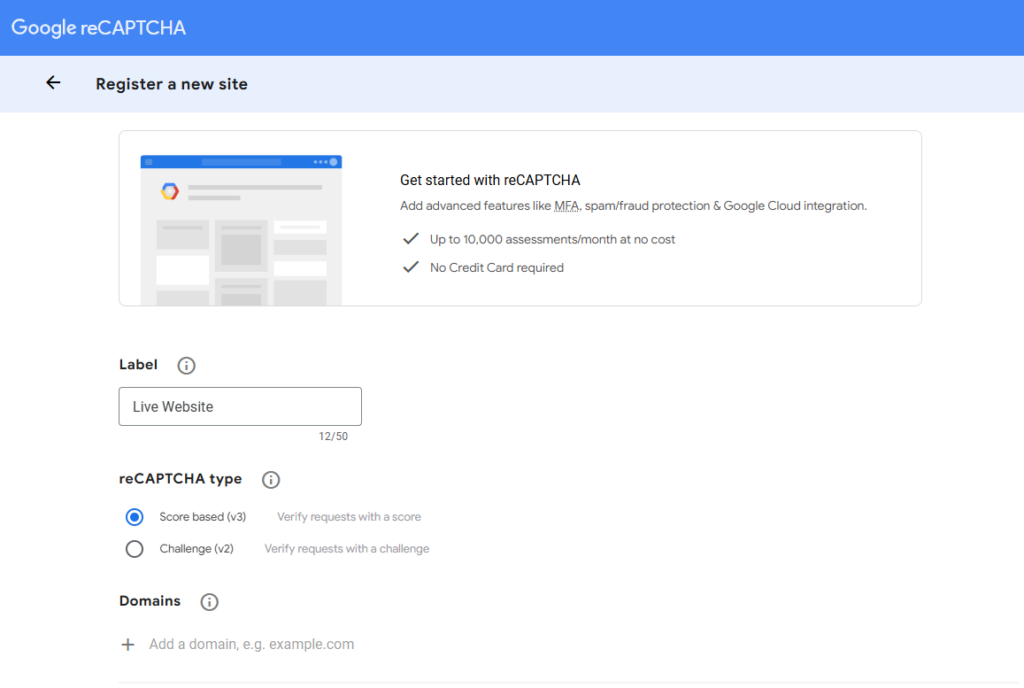
After updating this information, you should test both Google Analytics and reCAPTCHA to see if they’re working as expected. So, visit your Google Analytics console to view tracking data on your new site on Simply Static Studio.
To verify if Google reCAPTCHA is working, visit your site as a user to see if you’ll be presented with the human verification steps.
A common issue and how to solve it
If you get an error message on reCAPTCHA, here’s how to handle it. Ensure both your old and new domains are present in the Domains section of Google reCAPTCHA settings.
Why? Leaving the old domain enables a smooth transition to the new one. The old one can be live as you migrate to the new one. Suppose something goes wrong with the new domain; you can always roll back to the old one without breaking reCAPTCHA.
Moving from your hosting provider to Simply Static Studio and changing your domain name could leave outdated links. You’ll need to update these links to ensure they point to the right web pages or resources.
Step 4: Update internal links and URLs
After migrating your WordPress site to Simply Static Studio and converting it, there could be some links in your site that still point to pages or resources in your old site. WordPress stores a lot of internal links and image URLs as absolute URLsComplete web addresses that show the full path to a specific page or file on the internet..
When Simply Static Studio creates a static version of your site, these links can be copied as they are. Once your new static site is live, these links will point back to the old domain – even though your content is now on a new domain.
In other words, some of your internal links could be outdated.
Why this step is important
Outdated links harm user experience and SEO. When a site visitor clicks an outdated link, it will take them elsewhere other than where they intended to go in your website. They could have a difficult time navigating your website, which could translate to higher bounce rates.
As for SEO, search engines could find the old links and indexA list or database used to make searching faster. them instead of your new links. This will cause your new site to rapidly fall down the SEO rankings.
To prevent this from happening, you need to update your links.
How to update links
There are several ways to update your site’s internal links after migration, including:
Using a search and replace plugin
Search and replace plugins such as Better Search Replace can help you update your internal links automatically. To use this plugin, log in to your WordPress backend on the Simply Static Studio dashboard.

Then, install and activate it. After activating it, you should see it in the Tools section of your main menu. Once you click on it, it allows you to specify the old links to search for and the new links to replace the old links with.
Better Search Replace will search through your database and update these links for you.
Manually check key pages
You can also visit key pages such as the homepage, contact, about us, etc., and check if they have the right links. If you find a problem, go back to your WordPress backend and find the page you want to edit under Pages.
You’ll see some settings on the left side panel. Scroll down to find the Link tab. Enter the correct link and then click Save.
Run link check tools
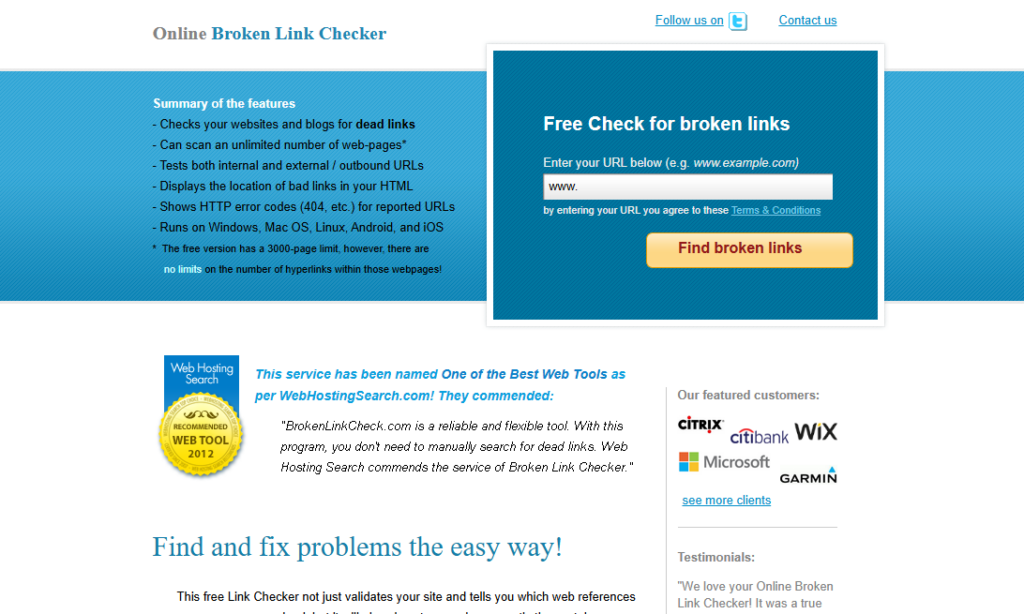
Link check tools such as Broken Link Check can help you identify broken links or dead links. These are links that no longer lead users to the intended page or resources. Once you find these broken links, you can either delete them, fix them manually, or do this automatically like we’ve discussed.
At this point, your static WordPress site is live, and you’ve fixed any potential errors. Users can now visit it and enjoy the performance benefits that come with hosting your static site on Simply Static Studio.
But the work doesn’t end here. You still need to monitor it and maintain it.
Step 5: Monitor and maintain your live site
Continuously monitoring your website will ensure it remains fast, secure, and user-friendly. This is important to keep your site visitors happy and engaged.
What to monitor
To keep your website running well at all times, here’s what you should monitor:
Site performance
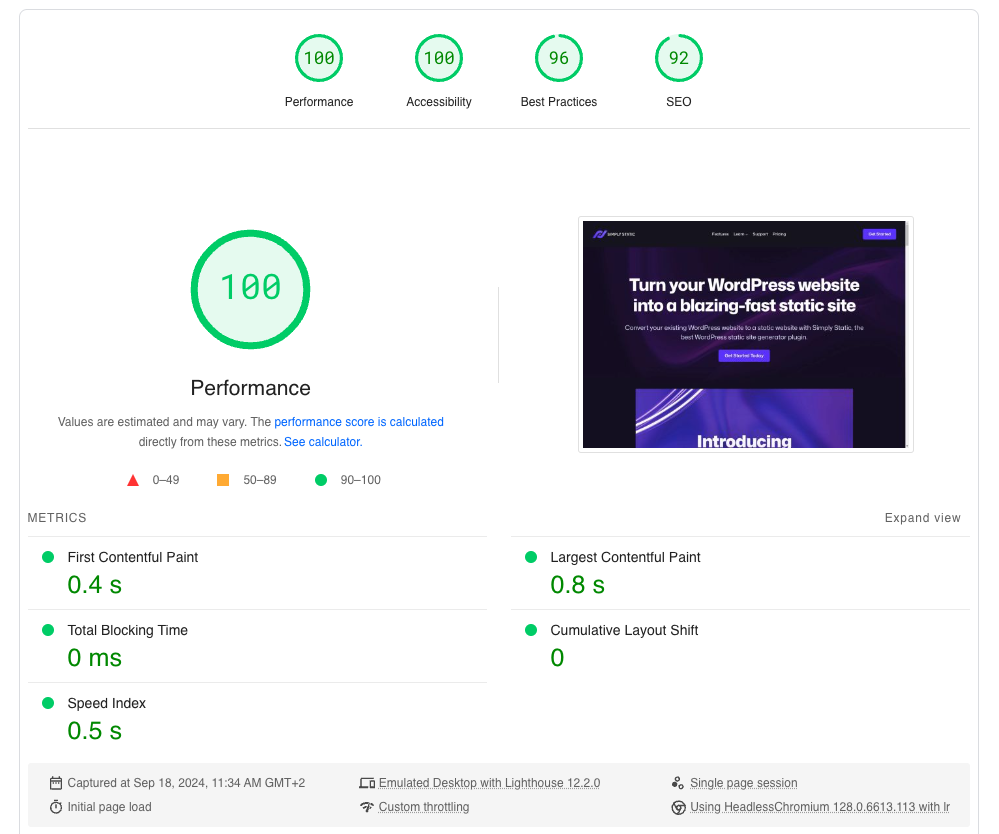
Although monitoring site performance is often reduced to measuring the page loading speed, there is more to it. You need to keep an eye on how well your site is running from both a technical and user experience perspective.
- From a technical perspective. Here, you’ll use website performance testing tools like PageSpeed Insights and GTmetrix to measure your site’s performance. These tools will give you technical information about how well your site performs according to the Core Web Vitals. This includes how stable the content on the site is, how long it takes for the largest element to be visible, etc.
- From a user experience perspective. It’s worth noting that page loading speed factors in a better user experience. Apart from this, you should also check how fast buttons and links respond. Ensure that the website is mobile-friendly. For example, ample space between clickable elements and other elements on the page.
It’s worth noting that Simply Static Studio monitors your site for you. You won’t have to do anything to keep an eye on your site.
Traffic and user behavior
You’ll also want to regularly monitor the traffic coming to your site and how users behave once they’re in it. This is where Google Analytics comes in handy.
It provides you with the following information:
- Who your site visitors are – their age, location, and whether they’re new or returning visitors.
- Where they come from – organic search, social media, or paid ads.
- The most popular pages, how long users stay on your website, etc.
This information can help you work on getting more site visitors and retaining the ones you have.
Best practices
Monitoring aside, you’ll also need to implement the following best practices to ensure your site works well.
Enable automated backups
Accidents happen. You could accidentally delete a key file or install a plugin that messes up your entire site. With automated backups, you’ll have a recent backup to fall back on if this happens.
Simply Static Studio has an automated backup system to help recover your site if disaster strikes. Once you enable it, you’ll be able to schedule when the backups will be performed and how long the backups are retained.
When you need to restore a backup, the Simply Static Studio team will do it for you at no additional cost.
Regularly update SSL certificates and plugins
SSL certificates are usually valid for 90 days to 1 year. Many hosts like Netlify and Cloudflare offer auto-renewable SSL certificates. Once the period in which the certificates are valid ends, they will automatically renew it for you behind the scenes.
But if you’re managing your own SSL, you’ll go to your SSL provider and update it manually once it expires.
Plugin developers release updates regularly. You also need to check for updates, preferably weekly, and update your plugins if you find a new version available.
Stay on top of security updates and patches
WordPress releases both major and minor updates that fix vulnerabilities, patch bugs, etc. WordPress automatically updates the minor releases (for example, 6.5.1) for you, but for the major ones, you’ll have to approve them first.
Congratulations, your static site is live!
Making your static site live is one of the final steps of the static site creation process. It is what makes your website accessible to the public. Simply Static Studio makes this process simple for you.
All you have to do is enter a CNAME record and connect your domain to make your static site live. Once your site is live, you’ll need to update your new domain information in Google Analytics and reCAPTCHA if you’re using them.
You should also update your internal links so that they don’t point to your old site or its resources. Finally, once your site is up and running, monitor it to ensure its performance, security, and user experience are up to scratch.
Ready to make your site live? Get started with Simply Static Studio and simplify your static WordPress website creation and management today!
Table of Contents

