Table of Contents
If you’re looking to utilize Kinsta static hosting for your WordPress website, this post is for you.
We already know that static sites are fast and secure. Hosting your static site on Kinsta allows you to leverage Kinsta’s powerful resources to improve your static site’s speed, security, and reliability.
In this post, we’ll walk you through a beginner-friendly guide on hosting your static WordPress site on Kinsta.
We’ll be covering:
- What Kinsta static site hosting is.
- The advantages of hosting WordPress on Kinsta.
- Steps to host your static WordPress site on Kinsta.
Let’s begin by looking at what Kinsta static hosting is.

What is Kinsta static site hosting?
Kinsta is a cloud-based platform that provides hosting services for WordPress websites, web applications, and other web projects.
Kinsta is known for its powerful resources, such as high-performance servers, and its managed WordPress hosting solutions – premium hosting services tailored specifically for WordPress sites.
Kinsta also has a service called Kinsta Static Site Hosting. This is a new and free hosting service for static sites, powered by Kinsta’s robust infrastructure. With this solution, Kinsta equips its users with the platform and tools to deploy their static websites quickly and easily – all without paying a single cent.

Here’s what you’ll be getting with Kinsta’s (free) Static Hosting service:
- 100 sites per company – You can deploy up to 100 sites, and if you reach this mark, Kinsta gives you the option to delete some to free up spots for new ones.
- 1 concurrent build per site – Once you initiate a deploymentThe act of pushing the static files generated by Simply Static to a live environment where users can access them., you must wait for it to complete before starting another one.
- 1 GB build image size per site – This simply means that the total size of your static site should not exceed 1GB.
- 100 GB bandwidth per month per company – This is a very generous offer as static sites usually require less than 5 GB bandwidth per month.
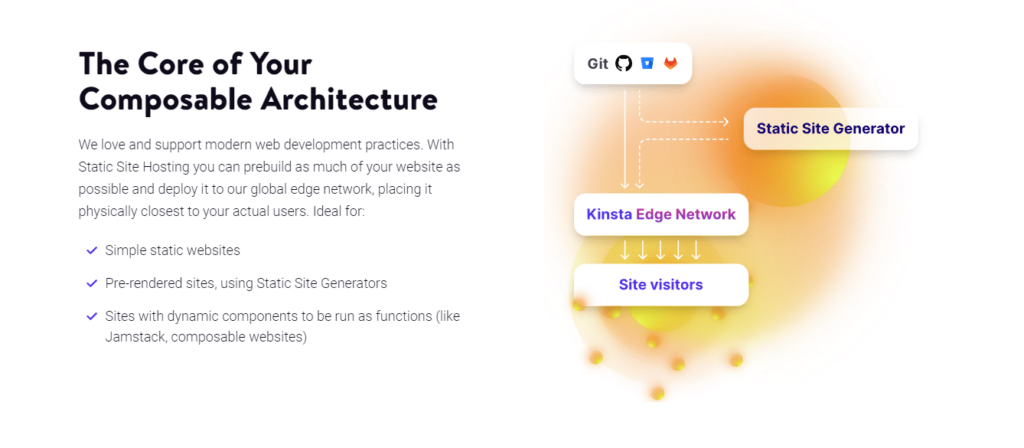
Kinsta integrates with your favorite Git providers and streamlines the entire process of deploying your static site. All you have to do is connect your static site’s repositoryIn version control systems like GitHub, a repository is the most basic element, a folder where all the files for a parti… from your preferred Git provider, and in just a few clicks, you’ll have your static site up and running.
We’ve been talking about static sites all this time, and you might not exactly be sure what this is in the first place. So, here’s what a static site is.
What is a static site?
A static site is a type of website that contains web pages with fixed content. Usually, it is made up of three types of files:
- HTML – to create the individual elements of the webpage, for instance, buttons, images, and text.
- CSSCascading Style Sheet. It’s a language used for describing the look and formatting of a document written in HTML. – to add styling to the webpage. This includes colors, positions, and sizes of the elements.
- JavascriptA programming language used in web development to create interactive elements on a webpage. – to make the webpage interactive, like what happens when a user clicks on a button.
These files are pre-coded, stored on a server, and remain unchanged until a developer manually updates them. Every single site visitor will see the same content when they access this type of website.
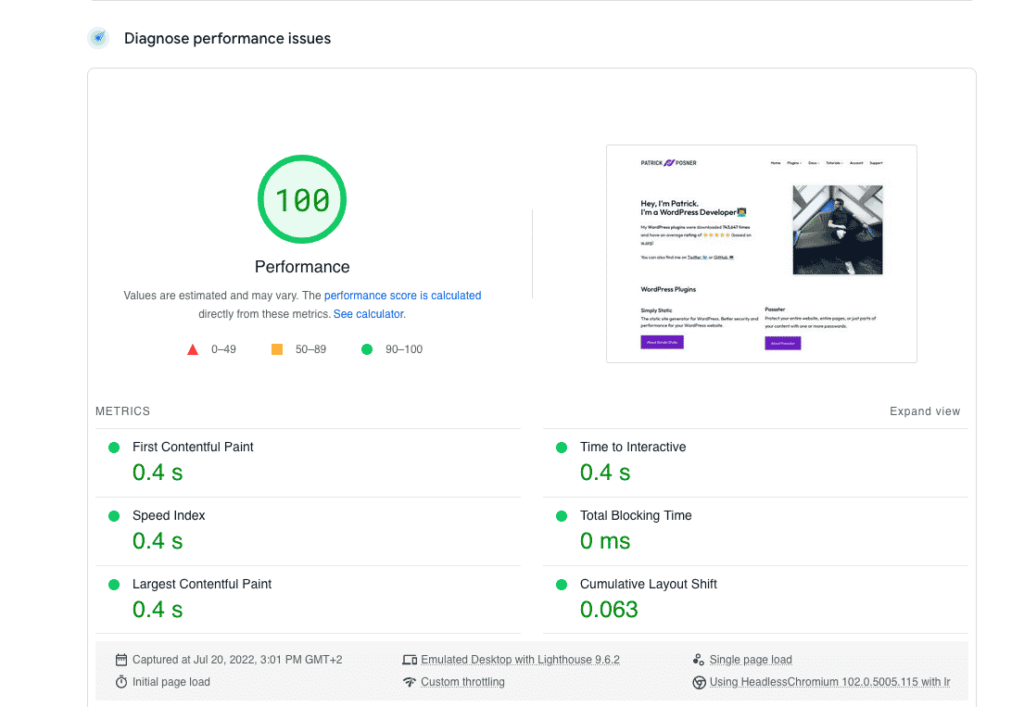
Static sites don’t process server-side code and have no database. This is what makes them so fast and secure. Static sites are perfect for websites that don’t need their content regularly updated, for instance, portfolios, documentation sites, and landing pages.
Unlike static sites, dynamic websites rely on programming languages (like PHPA widely-used programming language especially suited for web development.) to generate web pages on the fly. For these websites, the code to display the webpage is generated on the database, fetched, and delivered to the user’s browser once they click to view it.
NOTE: If you have a dynamic website, you can convert it into a static site with the help of static site generators like Simply Static (which we’ll introduce later). Kinsta supports Javascript frameworks like Node.js, allowing you to use these static site generators to convert your website. It also supports others like Jekyll (created using Ruby) and Hugo (created using GO).
For static WordPress websites, Simply Static is the way to go. We’ll be using it later in this guide to convert your WordPress site into a static site.
Now we know about Kinsta’s static hosting service and what a static site is. Let’s look at how you would benefit from hosting your static site on Kinsta.

The advantages of hosting WordPress on Kinsta
Hosting your static WordPress site on Kinsta has several advantages for you. Let’s explore them and see what’s in it for you.
High-speed static sites with exceptional performance
Kinsta Static Hosting allows you to combine the speed of a static website with Kinsta’s high-performance servers to give your site visitors the best experience. This is important in retaining site visitors and getting them to convert.
According to research, 40% of site visitors will abandon a website if it takes more than 4 seconds to load. Kinsta Static Hosting ensures you have fast-loading websites to minimize the bounce rate.
But that’s not all that a fast website is good for. It can also improve your SEO rankings because search engines like Google rank faster websites higher than slower ones. With a high SEO ranking, you can get more monthly site visitors.
On top of high-performance servers, Kinsta provides the following solutions to boost your static site’s speed further:
- Browser caching – Kinsta cuts loading times further for returning visitors through caching. It stores your site’s data in their browsers so that it can be retrieved and displayed quickly when they visit your site again.
- 100 GB bandwidth per month – With adequate bandwidth, your site can transfer data quickly and load faster.
More secure static sites
Kinsta provides a free SSLSecure Sockets Layer. A technology that encrypts the data transferred between a user and a website. certificate that creates a secure connection when users visit your sites. Because of this, they can share sensitive information with your site without worrying about hackers intercepting it.
This is perfect if you want customers to share personal information to create an account on your static site or when you want to take payments through your site.
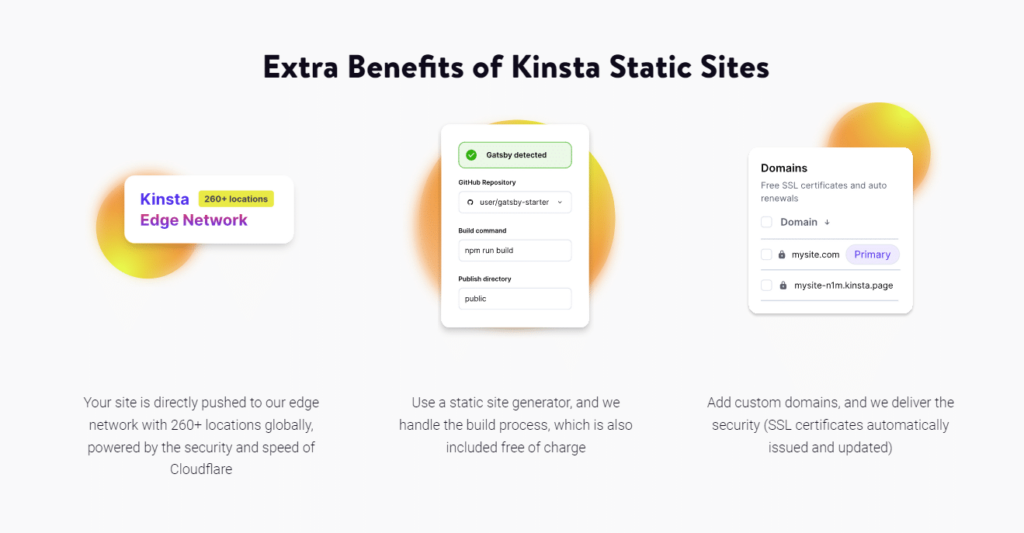
You’ll also get other security features like DDoS protection and a firewall, brought to Kinsta’s Static Hosting by CloudflareA company that provides services like security and website speed improvement. It acts as a protective layer between the ….
Security is paramount for all websites, as 84% of site visitors will abandon a purchase due to an unsecured connection.
Scalability
Kinsta has a content delivery network (CDN) of servers distributed in over 260 locations across the globe. During periods of high traffic, this CDNStands for Content Delivery Network. It’s a system of distributed servers that deliver web content quickly to users base… will distribute traffic across these servers, preventing your static site from crashing when traffic spikes. The speed and security of Cloudflare powers each server location.
Streamlined automated deployments
Kinsta integrates with GitHubA web-based platform for version control and collaboration, allowing multiple people to work on projects at once., GitLab, and Bitbucket. This means that you can connect Kinsta with your repository from these git providers and deploy your static site seamlessly.
To update your website, you can change its code and push the updates to your repository. Kinsta will automatically redeploy a new version of your static site with the changes you’ve made.
Who would benefit most from Kinsta Static Hosting?
This solution is ideal for WordPress developers looking to improve the speed and security of their sites without having to worry about servers, databases, and other backend staff.
It is also an excellent choice for small businesses/startups that want a fast website but have limited resources – Kinsta will ensure they have these resources free of charge.
Having looked at the benefits of hosting a static WordPress site on Kinsta, we’re now ready to go through the process of doing this. So, let’s get right into it in the next section.
Steps to host your WordPress site on Kinsta static hosting
Kinsta requires you to provide static files of your WordPress website to use its static hosting service. WordPress websites are natively dynamic, and they rely on PHP to generate web pages as soon as a user clicks to view them.
This is why we need the Simply Static pluginA piece of software that adds specific features to WordPress. – to help you convert your dynamic WordPress website to a static site.
Why use Simply Static?
With Simply Static, you can convert your WordPress website to a static site quickly and easily. In just one click, it converts each component of your website into its static version. This includes your theme, posts, and dynamic content like forms and comments.
Here’s what makes Simply Static, the most efficient and user-friendly static site generator for WordPress:
- Easy updates to your static site – This plugin allows you to easily update your entire static site or go page by page.
- Advanced search features – Simply Static utilizes search libraries like Fuse.jsA lightweight JavaScript library for searching, which allows for more flexible and forgiving searches. and AlgoliaA record of all the actions and changes made within the Simply Static plugin. It helps you track what has been done. to give your users a straightforward, more detailed search experience.
- Support for dynamic features – With Simply Static, you can use dynamic features like forms and comments on your static website.
- Deploy with your preferred provider – On its own, this plugin has several deployment options for you, allowing you to use your preferred service provider.
- Work with SEO tools and Page Builders – You can still work with popular SEO plugins like Yoast SEO and page builders like Elementor to improve your site’s SEO and appearance.
So now we know what you’ll be getting with Simply Static, let’s get into the process.
Step 1: Install Simply Static
First, purchase Simply Static from the official website: simplystatic.com.
Try static WordPress hosting free for 7 days
No credit card. No maintenance. No headaches.
Then follow these steps to install it in your WordPress website:
- From your WordPress dashboard, go to Plugins > Add New and then click the Upload Plugin button.
- Select the extension you downloaded after purchasing Simply Static and click Install Now.
- Next, click on Activate Plugin and add your license key to verify your purchase.
With Simply Static installed, you can now prepare your WordPress site for conversion.
Step 2: Prepare your site for conversion
Take these steps to prepare your WordPress site for conversion:
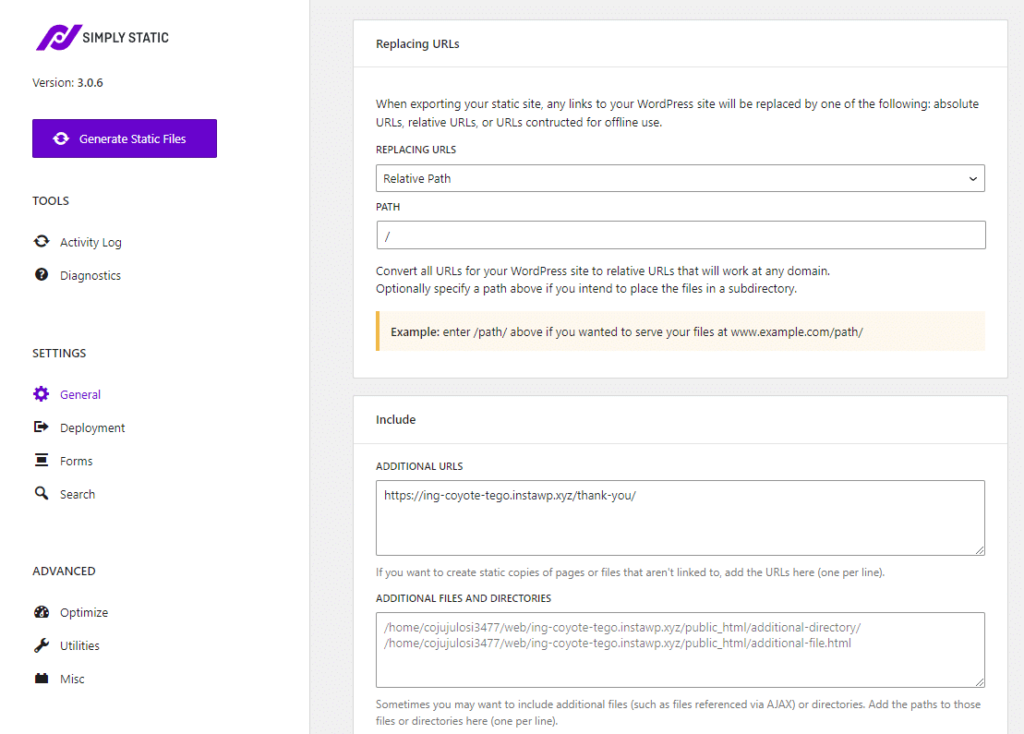
- From your WordPress dashboard, hover on Simply Static and click General.
- Use the include/exclude section to select URLs of the specific pages you want to exclude when the static files are generated.
- If you want to use dynamic features like forms, search, and comments, you can set them up here in their respective tabs.

Next, we’ll connect Simply Static with GitHub and exportThe process of saving the files and data from your WordPress site to create a static site. your static files as soon as they’re generated.
Step 3: Connect Simply Static with GitHub
This step automates the deployment process, and any changes you make to your static site will be automatically updated on the live website.
You can utilize Simply Static’s GitHub integrationThe act of combining different systems, software, or functionalities to work together as a unified whole. feature to export your static site’s files to GitHub as soon as they’re generated.
To do this, take the following steps:
- Create a GitHub account here: github.com if you don’t already have one. After creating your account, create a repository for this project. Need help with this stage? Our detailed guide will walk you through it.
- Once done, go back to your WordPress dashboard.
- Go to Simply Static and click the Deployment tab. Here, select GitHub as the deployment option.
- Add the details of your account, like the account type, personal access token, email, username, and repository, in their respective fields.
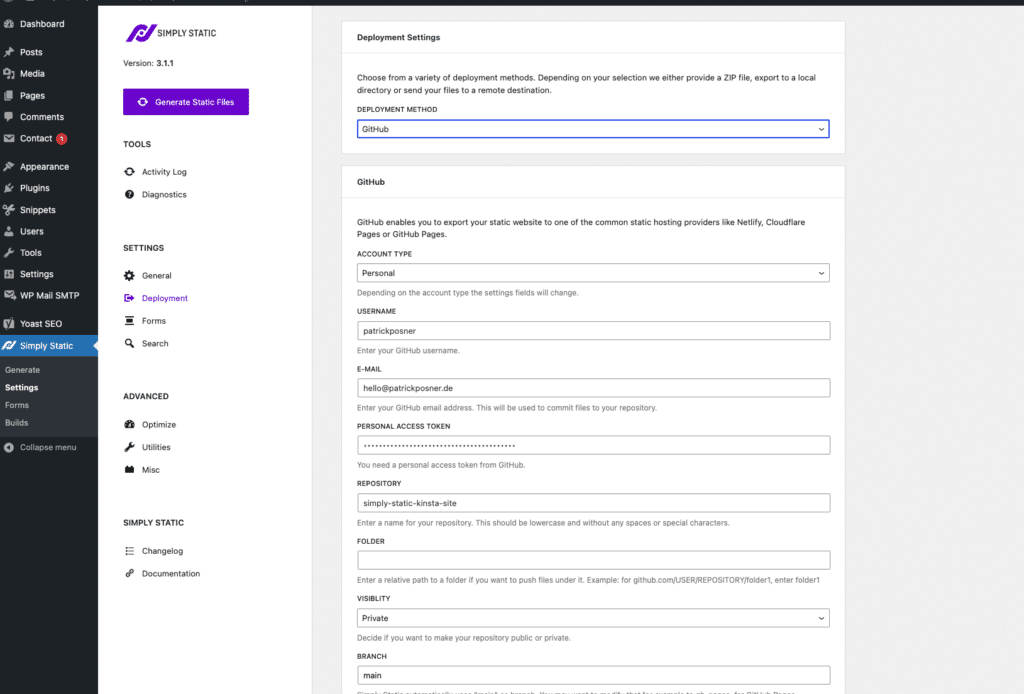
- After completing these settings, click the Generate Static Files button on the top left.
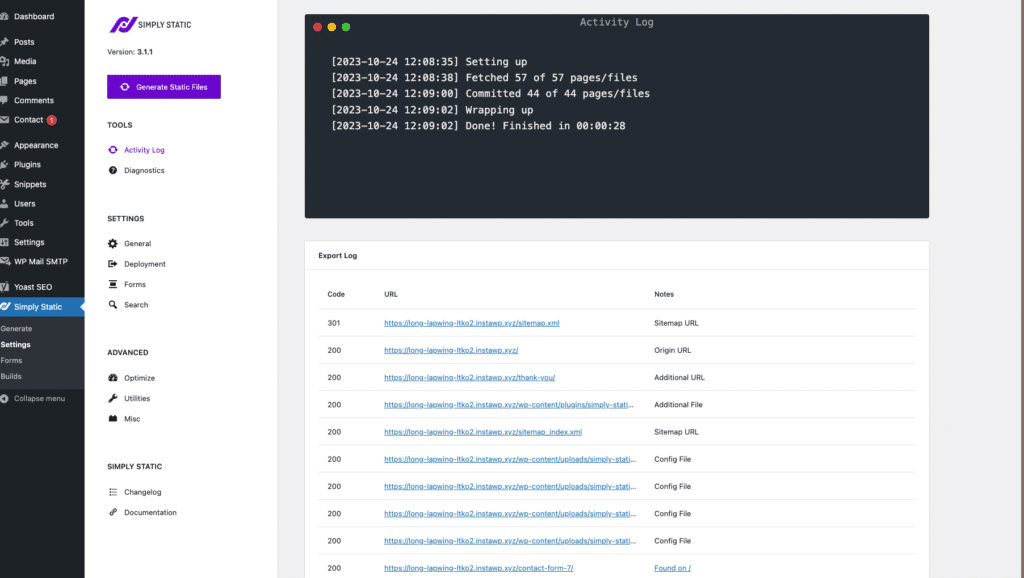
Your static files will be generated and exported to your GitHub repository. This could take some time, depending on the size of your site. You can always check the progress in Simply Static > Settings > Activity LogA record of all the actions and changes made within the Simply Static plugin. It helps you track what has been done..
Once the export is finished, your static files will appear in your GitHub repository.
Step 4: Connect Kinsta to your GitHub account
In this step, we’ll log into MyKinsta dashboard and connect your GitHub account to your Kinsta account.
- Log into your MyKinsta dashboard. If you don’t have a Kinsta account, you can sign up here.
- Once logged in, click on the Static Sites tab and then the Add Static Site button.
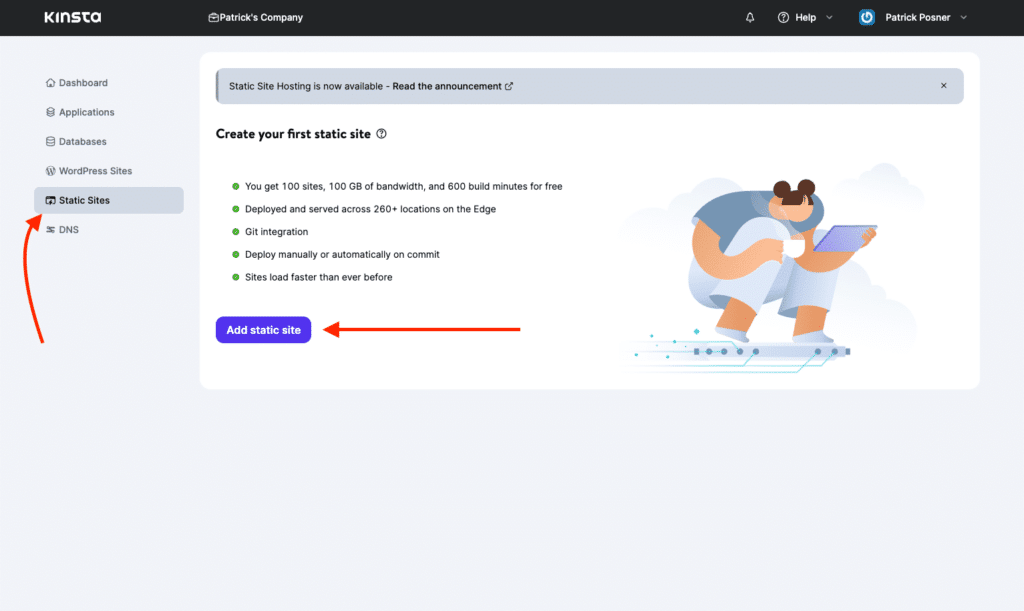
- On the next page, select GitHub as your preferred Git provider.
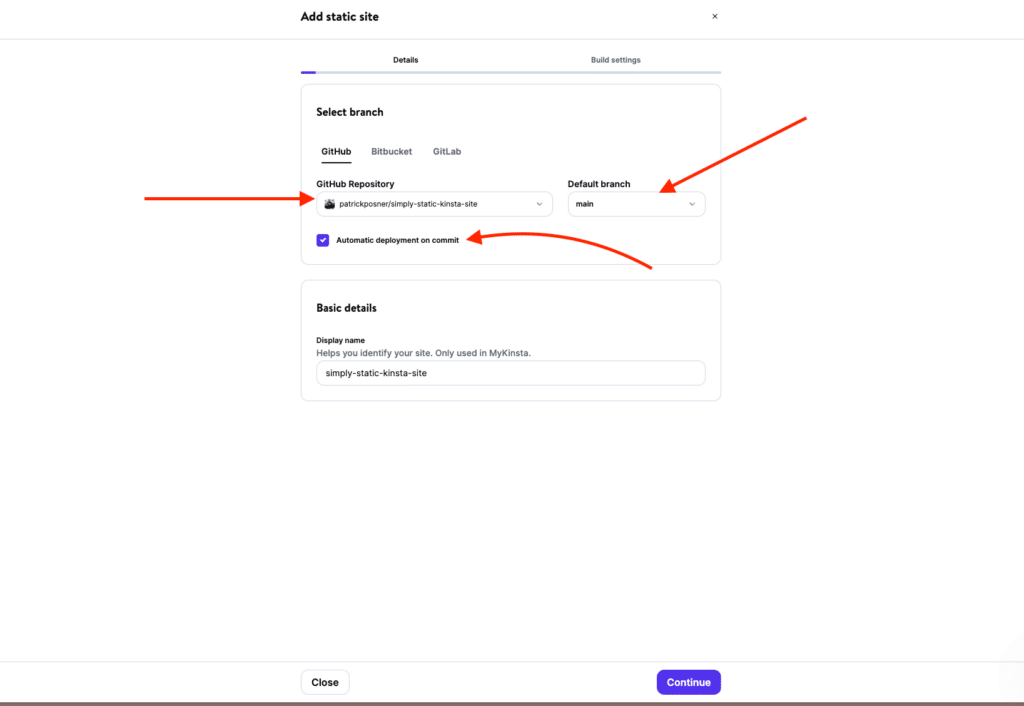
- Next, click on the GitHub Repository dropdown and then Edit Github permissions. Log into your GitHub account to give Kinsta permission to access your account.
- Select the repository containing your static files and check the box ‘Automatic deployment on commit.’ This will allow you to automatically update your live website each time you export a new version to GitHub.
- You can leave the default branchIn version control systems like GitHub, a branch is a separate line of development that can be merged back into the main… as ‘main’, but if you exported to a different branch, you can add it in this section. Click Continue to proceed.
Step 5: Deploy your static WordPress site
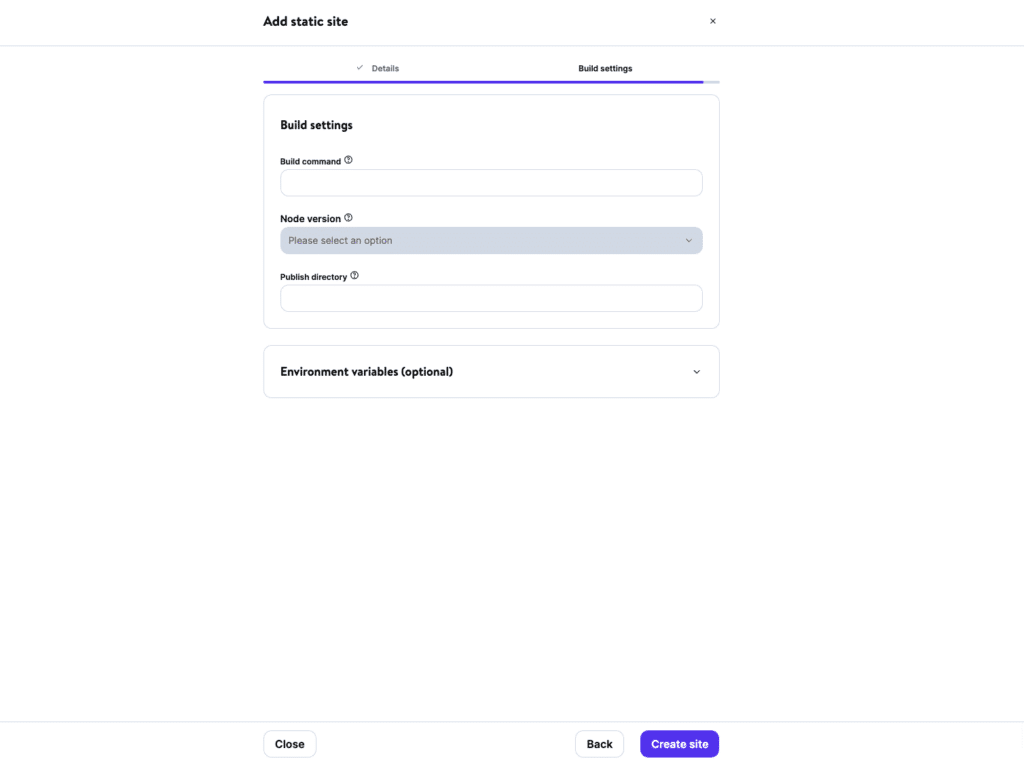
On the next page, you’ll see the build settings. You can leave them as they are, as they have nothing to do with Simply Static. Click on Create Site to start deploying your website. It takes a few seconds to deploy your website, but it could be longer depending on the site of your website.
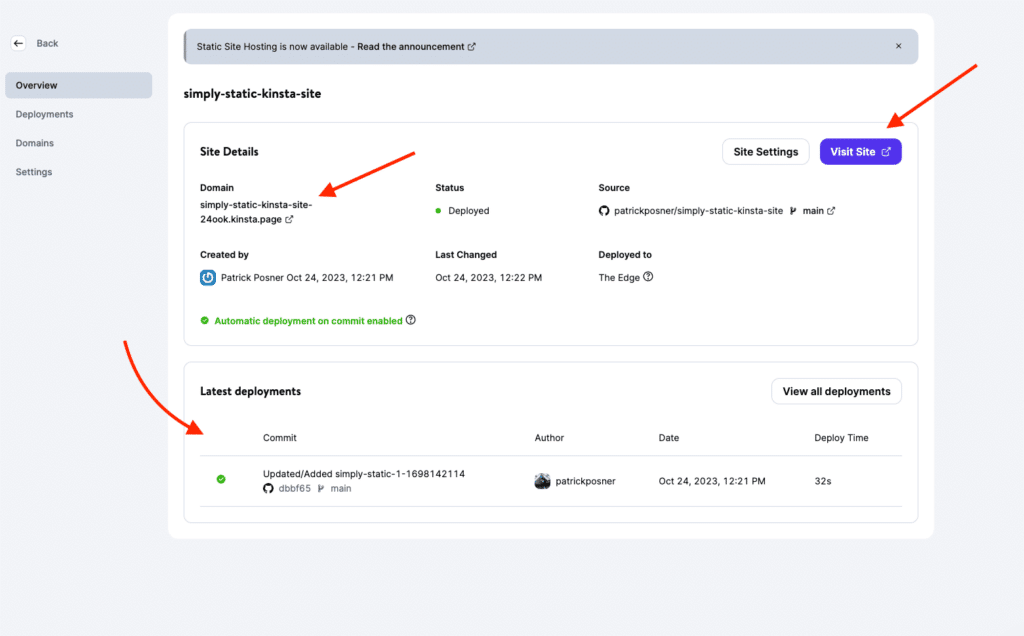
You’ll be redirected to the project overview page. Once the status changes to Deployed, you can use the Visit Site button to view your live static site.
Step 6: Add your domain
There’s one last thing you’ll need to do here – add your domain. Once the deployment is completed, you will be assigned a temporary domain.
If you want to map it to your custom domain, go to Domains > Add domain. After adding your verified domain, you can make it the primary domain for your static site, and that’s it.
Set up your static site on Kinsta today
With speed and security becoming increasingly important today, the value of static sites can’t be overlooked. Kinsta Static Hosting provides a fast, secure, and free solution for hosting your static WordPress site. With this solution, you’ll have high-performing static websites at no cost at all.
Simply Static makes all of this possible. It streamlines converting your WordPress site to a static site and makes your static files available to Kinsta for deployment.
With Simply Static, you can combine all the advantages of WordPress together with the robustness of Kinsta to realize great-looking, fast, and secure static WordPress sites.

