Table of Contents
As a WordPress site owner, you probably already know that WordPress, by default, doesn’t offer much in terms of search functionality for your static site.
Ideally, you want to let site visitors quickly find what they need using the search bar on your static site. This also gives you insights into what people look for when they visit your site. However, the default WordPress search functionality won’t cut it – you need a better search pluginA piece of software that adds specific features to WordPress. for your WordPress site.
In this article, we’ll take a look at AlgoliaA record of all the actions and changes made within the Simply Static plugin. It helps you track what has been done. and how you can use its powerful search functionality on your static WordPress-powered site in three simple steps.
Search functionality for static websites
If you’re looking for a simple yet professional solution for adding search functionality to your static site, Algolia is the right tool for you.

Static websites by default don’t have much built-in search functionality. Because of this, people have a difficult time finding what they’re looking for.
To add search functionality to your site, you need to start by indexing content and then creating a search and API to access the indexA list or database used to make searching faster.. In addition to this, you also need to build a user interface that people can use to run search queries.
Although all of this may sound like a huge challenge, it is very easy to do with a robust search tool like Algolia. Before we jump into how you can use Algolia with your WordPress site, it’s important to first understand what exactly Algolia is.
Algolia search-as-a-service platform
Algolia offers a simple site search and discovery service that’s powered by AI. Developers can build top-notch apps with Algolia’s API that fetch exactly the right content that was requested by the end user.
The main benefit of using Algolia is the lightning-fast speed it offers by leveraging AI capabilities. You need a quick and responsive search engine API on your site so that site visitors can quickly find the content they need. Algolia also lets you fully personalize the search experience according to your audience and your brand. As a result, you have access to A/B tests and search analytics from the admin dashboard. It also offers insights into how well the search API is being used by users on your site.
Try static WordPress hosting free for 7 days
No credit card. No maintenance. No headaches.
Other than being simple to use and offering a powerful API, Algolia offers top-notch security that can help you keep your site and your users safe from online threats.
The good news is that our Simply Static Pro plugin offers a direct integrationThe act of combining different systems, software, or functionalities to work together as a unified whole. with Algolia. It’s incredibly easy to set up and you don’t have to install a separate plugin. You can implement the Algolia API on top of your WordPress-powered static site in no time. It replaces the default WordPress algorithm with Algolia’s top-notch APIs and integrates seamlessly with Algolia’s Instant Search feature.
How to use Algolia with WordPress
Here, we’ll show you how to use Algolia with WordPress to add search functionality for static websites.
Step #1: Set up Algolia
To get things started, we first need to create an account on Algolia and get the API keys. You’ll need these to connect your WordPress static site to Algolia.
Once you have created an account, you have to set up an application. Give your application a name, choose the free package, and move on to the data center selection:

Now choose a data center near to you and go to the setup summary:


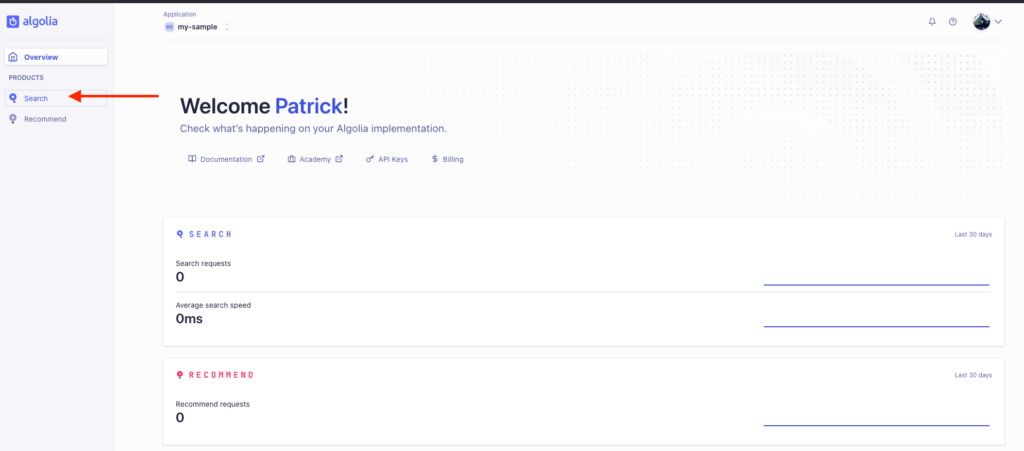
Your application was created successfully. You will land on the project dashboard. There is a direct link to the API keys that you will need to copy and add to the Simply Static Settings (as described in Step 2), but before we do that, let’s create an index. Click on “Search” to navigate to the search settings.
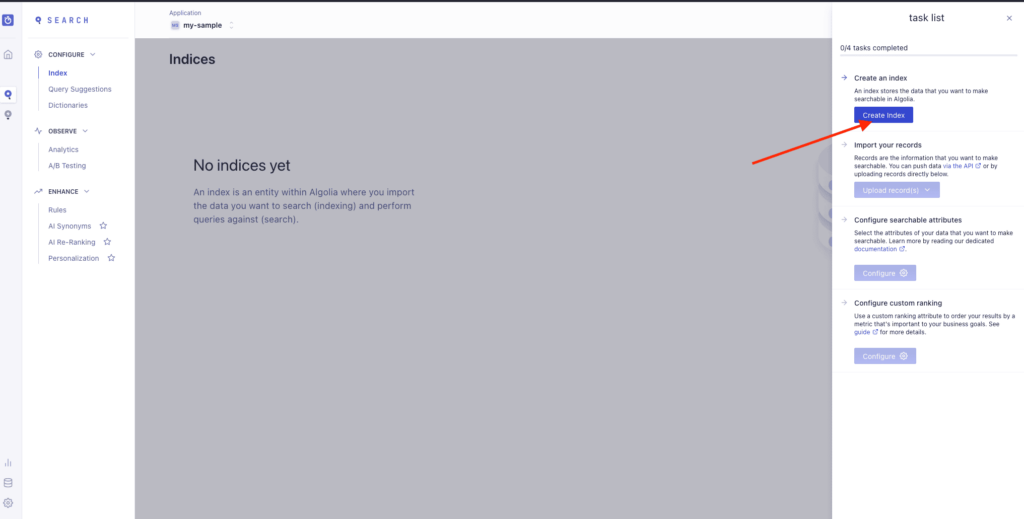
On the right side of the screen, click “Create Index” and give it a unique name. That’s it. Now you are ready to finish the setup in Simply Static.
BTW: the API keys are completely free for small personal projects and non-commercial use. This can be a great way to get you started, especially if you’re starting to build a static website on a budget or simply want to test out the waters.
Step #2: Configure plugin settings
Head over to Simply Static → Settings from the WordPress admin panel and click on the Search tab. Scroll down till you reach the Algolia section.
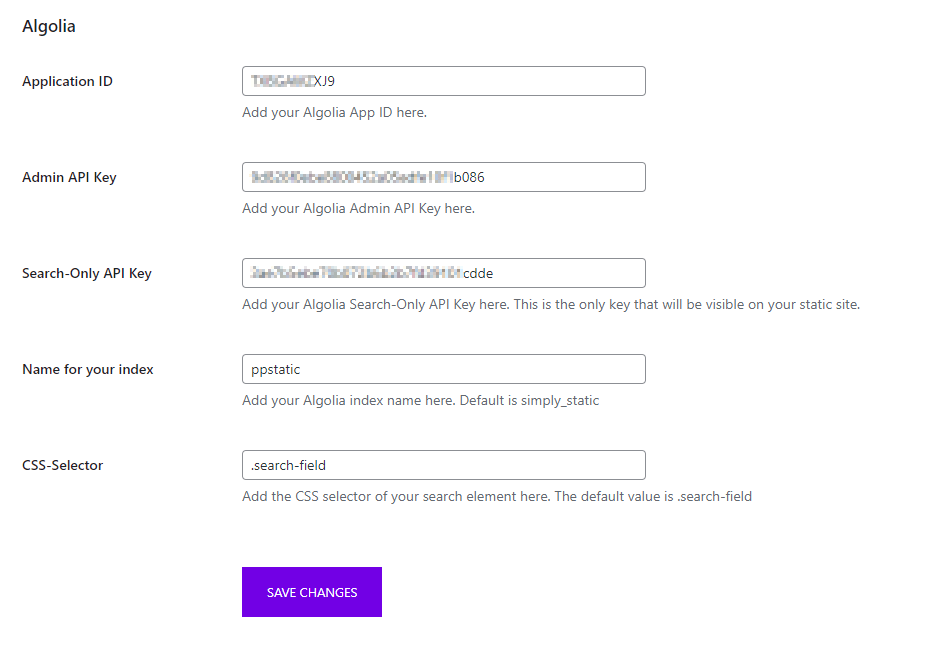
Here, you can add the Algolia Application IDA unique attribute used to identify a single element on a webpage. It is often used for linking, styling, or scripting. and API keys, and set the index name for your site. It’s important to note that the search feature won’t start working properly until you set the Admin API keyA unique code that allows different software applications to communicate with each other. It’s used for identification a… in place and click the Save changes button.
Press the Save changes button to continue.
With Algolia search for WordPress, the autocomplete results feature will be enabled by default. This makes for a more user-friendly search engine for your WordPress site.
This is how the Algolia instant search results will look on the front-end of your WordPress static site:

Conclusion
It can seem like a challenge at first to set up an advanced search engine on your WordPress static site. The good news is that with the right tools it’s not only achievable but incredibly easy to set up. The Simply Static Pro plugin offers direct integration with Algolia. This enables you to set up an instant search on your WordPress static site.
Using Algolia’s API keys to optimize search engine results on your WordPress site is a great way to let site visitors quickly search and find the content they need. You want to make sure it’s easier to find content on your site or else people won’t bother trying. This way, it causes site visitors to bounce off your site and decrease conversions.
Before you set up a professional search results solution on your static site, check out our guide on various tools that let you implement a search on a static site for more information.
